
Get the Most out of Your Free Trial
Scroll down for more…
8. Import PowerPoint into Existing Slide Blocks
Complete this 5-minute exercise to import PowerPoint slides into placeholder PPT Slide blocks in your Facilitator Guide.


Quick Steps
As you are building your Lesson pages, add PPT Slide blocks as they are needed, using the Instructor-led (ILT) Content Blocks drop-down list to add the Slide blocks.
When ready to run the slide import, start by getting your computer ready:
If your computer has not been completely shut down in a day or two (or more) now is the time to Save & close everything and turn your computer off.
Leave it off for 2 – 3 minutes.
When you turn it on again, only open Word and bring up your Facilitator Guide – the document you want to import slides into.
Get your Facilitator Guide ready:
On the LGPro ribbon in the Controls group, click the TAG button and then the Update All Fields button, and then Save.
Go to the last Slide block in your Facilitator Guide and note the slide number.
Get your PowerPoint file ready:
Find and open the PowerPoint file to import.
Close any other open PowerPoint files.
Compare the number of slides in your PowerPoint file to the number of slide blocks in your Facilitator Guide. They must match.
Click Special in the Controls group on the LeaderGuide Pro ribbon.
Click Replace under PowerPoint or Keynote Slide images.
Work through the four Replace & Import Slides dialog boxes
When the Import is complete, your slide images will be in the Slide blocks in your Facilitator Guide.
Use the detailed steps that follow for more guidance.

Add PPT Slide blocks to your Lesson pages when slides are needed.
On a Lesson page, when you need to cue the facilitator to show a slide…
Place your cursor in the Content Block above/before the spot where you need the Slide block.
Click Instructor-led (ILT) in the Content Blocks group on the LeaderGuide Pro ribbon.
Click PPT Slide in the drop-down list of Content Blocks.
Detailed Steps


Start by getting your computer ready:
If your computer has not been completely shut down in a day or two (or more) now is the time to Save & close everything and turn your computer off.
Leave it off for 2 – 3 minutes.
When you turn it on again, only open Word and bring up your Facilitator Guide or Participant Guide – the document you want to import slides into.

Get your Facilitator Guide ready:
Click TAG in the Controls group on the LeaderGuide Pro ribbon
Click Update All Fields
Save
Go to the last Slide block in your Facilitator Guide and note the slide number.


Get your PowerPoint file ready:
Find and open the PowerPoint file to import.
Close any other open PowerPoint files.
Compare the number of slides in your PowerPoint file to the number of slide blocks in your Facilitator Guide. They must match.
If the number of slides in your PowerPoint file and the number of slide blocks in your Facilitator Guide do not match:
With both files open – your PowerPoint file & your Facilitator Guide – go slide block by slide block and slide by slide to compare and find the discrepancy.
If your Facilitator Guide is missing a slide block or two or three, use the Instructor-led (ILT) Content Blocks function to add them into your Facilitator Guide where needed. Then click Update All Fields to correct the slide numbers.
If your PowerPoint file has “extra” slides, whether they are Hidden or just other slides that you don’t need in your Facilitator Guide:
Make a copy of your PowerPoint file and name it “Import-The Name of My Slide File”
Delete the extra slides
Use this file to import into your Facilitator Guide

Import your slides:
Click Special in the Controls group on the LeaderGuide Pro ribbon.
Click Replace under PowerPoint or Keynote Slide images.
Replace?
Even though you are about to import images of your slides into your Facilitator Guide, you are using a Replace function because LeaderGuide Pro is going to replace the empty space, or whatever is currently in your Slide blocks, with the slide images you are about to bring in.


Work through the four Import Slides dialog boxes:
First you will see a dialog box asking if you are replacing PowerPoint or Keynote slides. Click YES for PowerPoint.
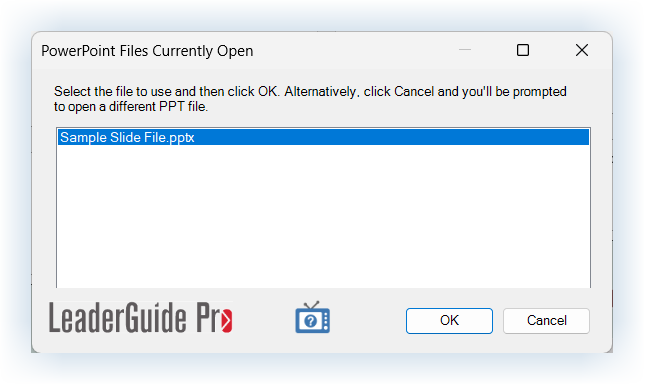
Next you will see a dialog box showing the PowerPoint files currently open on your computer.
This is why you should only open the one PowerPoint file that you need. It makes it easy to select the correct file.
Highlight the slide file you need and click OK.
If the PowerPoint file you need is not showing in the dialog box, click Cancel and Navigate to the file you need. Select it and click OK.
In the next dialog box you will see, Importing Slides, click OK in the lower right corner.
In the final dialog box you will see, click Yes
To have the slide images placed in column 2.
To change the slide placement column 1 or column 3, click No.
This will bring up a dialog box where you can enter your preferred column location.


When the Import is complete:
Your slide images will be in the PPT Slide blocks in your Facilitator Guide.
