
Get the Most out of Your Free Trial
Scroll down for more…
9. Import PowerPoint as You Start a New Facilitator Guide
Complete this 5-minute exercise to import a PowerPoint file as you start a new Facilitator Guide. DOWNLOAD our Sample PowerPoint File.


Quick Steps
Download & open our Sample PowerPoint file. Close any other open PowerPoint files.
With Word open & a blank new document on your screen, click the LeaderGuide Pro tab along the top of your screen to bring up the LeaderGuide Pro ribbon.
Click New on the LeaderGuide Pro ribbon.
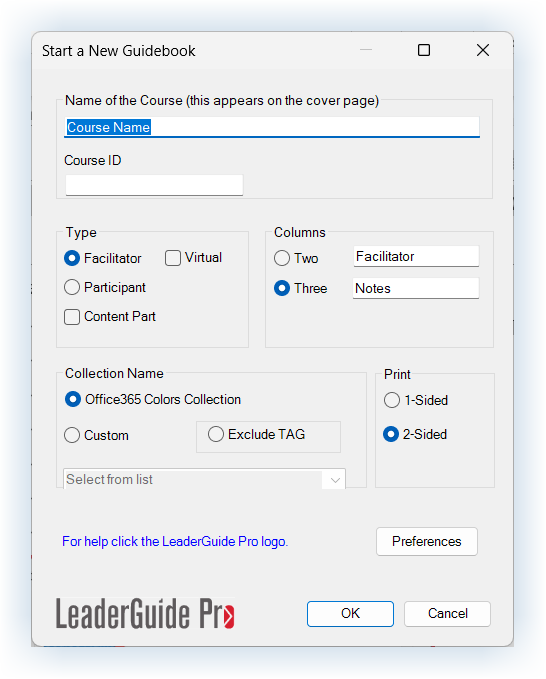
Use the Start a New Guidebook dialog box to set up your new Facilitator Guide
Type in a Course Name Juno Product Launch
Type in a Course ID JPL-23
Leave Facilitator as the Guidebook Type
Leave Columns set at Three
Click Custom and select Office 365 Light Blue Collection
Leave Print set at 2-sided
Click OK
Save your new Facilitator Guide in the location LeaderGuide Pro defaults to.
And click Yes to the question “Are you ready to add images to the document now?”
Click OK in the Add Images dialog box to leave the default settings in place:
Image type - PowerPoint
Image placement - Column Two
Notes placement - Beneath.
Next you will see a dialog box listing any PowerPoint files that are currently open.
In this case there should be one file and it should be highlighted: 1_Juno Classic Gear_No TOC.pptx
Click OK to select the highlighted PowerPoint to import.
Next, use the TOC Markers dialog box to set up your Table of Contents by adding Module and Lesson names.
See detailed instructions below.
Or click the blue X to close this dialog box and move on to the final step.
In the Importing Slides dialog box, click OK in the Add Images dialog box to leave the default settings in place and start the import.
Take your hand off your mouse.
Wait for a message telling you the import is complete.
In the message telling you the import is complete, click OK and go to the first Lesson, Welcome, in your new Facilitator Guide to see your imported slide images and notes.
Use the detailed steps that follow for more guidance.

Open the PowerPoint file to import.
Close any other open PowerPoint files.
Detailed Steps


Bring up the LeaderGuide Pro™ ribbon in Word.
Open Word and bring up a blank new Word document on your screen
Click the LeaderGuide Pro tab along the top of your screen to bring up the LeaderGuide Pro ribbon (LGPro ribbon).
Keep the LGPro ribbon displayed as you work.


Use the New button on the LeaderGuide Pro ribbon
Click New on the LGPro ribbon
This will bring up the Start a New Guidebook dialog box


Use the Start a New Guidebook dialog box to set up your new Facilitator Guide
Type in a Course Name Juno Product Launch
Type in a Course ID JPL-23
Leave Facilitator as the Guidebook Type
Leave Columns set at Three
Click Custom and select Office 365 Light Blue Collection
Leave Print set at 2-sided
Click OK

Save your new Facilitator Guide when prompted
After clicking OK in the Start a New Guidebook dialog box:
Take your hand off your mouse
You will see a progress bar as LeaderGuide Pro creates your new document
Next you will be taken into Microsoft File Explorer to SAVE your new Facilitator Guide in the LGPro Library Local folder that was added when LeaderGuide Pro was installed. The file path looks like this:
C:\Users\Your ID\Documents\LGPro Library Local\Facilitator Guides\3-Column
After you Save your new Facilitator Guide:
Wait a moment and you will see this question:
Are you ready to add images to the document now?
Click Yes
Next you will see a series of four dialog boxes that you will work through to import your slides.
Take your time and let LeaderGuide Pro walk you through the slide import process – it’s easy!

NOTE:
You must Save your new Facilitator Guide.
We recommend that you save to the location LeaderGuide Pro defaults to every time you Save or Open your LeaderGuide Pro files.
This folder was added to your C drive/local directory when LeaderGuide Pro was installed.
In the future, you can move this folder, and you can also Save to other locations, but as you get started with LeaderGuide Pro using the LGP Library Local makes it easy to find your files.

After you say YES
After you say YES to the question “Are you ready to add images to the document now?” you will see the Add Images dialog box shown to the right.
Click OK to leave the default settings in place for this exercise
Image Type = PowerPoint
Image Placement = Column Two
PPT Notes Placement = Beneath


A dialog box will appear listing the PowerPoint files that are currently open
If you opened our Sample PowerPoint file as you got started, and closed any other open PPT files, then this will be easy!
In this case there will be only one PowerPoint file listed and it will be highlighted/selected.
Click OK to select this file to import.
If the file you need is not showing in the dialog box:
Click Cancel
Navigate to the file you need
Select the file and click OK


Now it’s time to set up your Table of Contents
When you this dialog box on your screen, it will be showing the slides in your PowerPoint file.
When you get to this dialog box you have two options:
Either use this dialog box to set up your Modules and Lessons.
Or click the blue X to close this dialog box and move on to the final step.
If you X out, then all your slides will be added into the first lesson in the first module in your new Facilitator Guide. And your Table of Contents will list your first Module and Lesson as New Module and New Lesson.
For this exercise, follow the instructions below and use this dialog box.

Add Module and Lesson Names
Click on <Module Name> New Module to populate the skinny white box

In the skinny white box, type over New Module with Introduction

Next to Replace name … click on the AB-AC image to replace “New Module” with “Introduction” in the big white box on the left

Repeat this process to replace “New Lesson” with “Welcome”

After you close out of the TOC Markers dialog box you will come to the final step:
Click OK to leave the default settings in place and start the import.
Take your hand off your mouse.
Do not do anything else on your computer while the slide import is taking place.
Your screen may jump and flash as LeaderGuide Pro imports your slides
Wait for a message telling you the import is complete


Once the Slide Import is complete:
You will see a message telling you the action was completed successfully.
Click OK
Go to the first Lesson in your new Facilitator Guide to see your imported slide images & slide notes.
Scroll through the pages to see what you have,
