

AuthorTec Resize Pictures
How to Use
Note for legacy users of AuthorTec Resize Pictures: This tool is located on the Insert tab in Word.
Overview
AuthorTec Resize Pictures allow you to perform these time-saving tasks:
Adjust the size of a multiple pictures at once, embedded or linked, in an open Microsoft 365 Word document
Add or remove borders from those images, which you can do as you resize them.
AuthorTec Resize Pictures works with:
inline pictures
pictures with wrapping text
imported PowerPoint slides
regular picture images
How to Use AuthorTec Resize Pictures

AuthorTec Resize Pictures Dialog Box step by step
TIPS
The Resize and Border dialog can be dragged to anywhere on your screen.
Even while the dialog is displayed:
You can click in your document to select different ranges that contain pictures you want resized or bordered.
And you can navigate through your document to mark specific pictures. This is especially handy when working in a large document.
FYI: As you click back and forth between the Resize dialog and your document, you will notice that it takes two clicks in the document to perform the selection. This is normal. However, you can use the key combination of ALT+TAB if you don’t want to double click.
To make sure you don’t miss anything, it makes sense to work through your document in a logical order, from start to finish.
Access help anytime by clicking on the AuthorTec logo in the dialog box.
Step One - Select your Pictures
Open the Word document you want to work with, open AuthorTec Resize Pictures and select the pictures you want to resize and/or border. Your options are:
All
Selective - All pictures within a selective range, or multiple ranges
Mark Selective - Mark specific pictures throughout your document
To set a Selective Range
Click Selective in the Resize dialog box
Then select a range in your document that contains pictures you want resized or bordered
Click OK
Repeat as needed
To Mark specific images
Click Mark Selective in the Resize dialog box
Navigate to your first picture, select it, click Set Mark
Repeat as needed
If you change your mind about a selected picture, click Remove Mark
When everything you need is marked, click OK
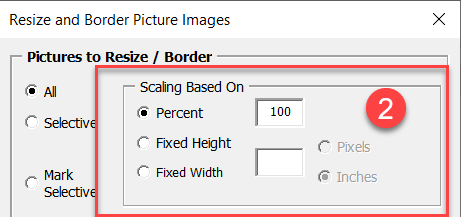
Size. You can adjust image size in two ways.
Percentage - Based on a percentage of each image's current size in the document.
The software considers the current size as the full size, regardless of the picture's actual original size. This makes it easier to think about how much you want to adjust the size.
If you want a series of images to be 10% smaller than they currently are, then set the resize percentage to a value of 90.
If you want the images to be twice the size they currently are, then set the resize percentage to 200.
Absolute Value - By providing an absolute value for the new height or width of the images.
The value can be in either Pixels or in Inches or Centimeters, based on how you have Word setup for measurements.
The software maintains the proper aspect ratio on the image, thus, only one dimension (height or width) is needed. The image’s other dimension is adjusted proportionately.
If the image being resized resides in a table cell...
And the table is setup not to adjust its cell widths based on content within the cell, then …
the software will only enlarge the picture, including the width taken up by any border on the image, to the width of the table cell.
AuthorTec Resize Pictures Dialog - Step Two
About the resize percentage box
Only enter whole numbers into the resize percentage box.
Do not enter decimal points, negative signs, or any alphabetic character such as a percent sign.
A number of 0 or numbers of 00 or 000 are also not valid numbers.
If you use a number that is less than 10, your pictures are going to get mighty small and you probably are not going to be very happy with the result.
About Absolute Height or Width
All entries must be numeric
Negative numbers are not allowed
Decimals are allowed
thus values of 0.33 or 1.5 are valid settings.
Step Three - Add or Remove Borders

AuthorTec Resize Pictures Dialog box Step Three
Add Borders as you Resize
If you are adding a border to images you can:
Use the preset border options of a grey, blue pink or green single line box, or
Set a custom border with your exact:
Border Line Style
Border Line Width
Border Line Color
Add or Remove Borders Only - without Resizing
If you only want to add or remove borders on all or selective images and otherwise keep all image sizes exactly as they currently are in the document:
Use the resize by percentage option
Leave the resize percentage at 100
Make your adjustments to the Border options provided in the dialog.
Steps 4 & 5
The OK & Close buttons
Use the OK button as you work, once your changes are set
Use the CLOSE button once you are all done, to close the Resize Pictures dialog box.
Click the AuthorTec logo for written help as you use this tool.
