
Get the Most out of Your Free Trial
Scroll down for more…
5. Work with a Lesson Page
Complete this 2-minute exercise to go from a starting point Lesson page to several lesson pages built with content blocks to provide your facilitator “at a glance” instructions about what to say and do.

Quick Steps
This really does not take more than a couple of minutes!
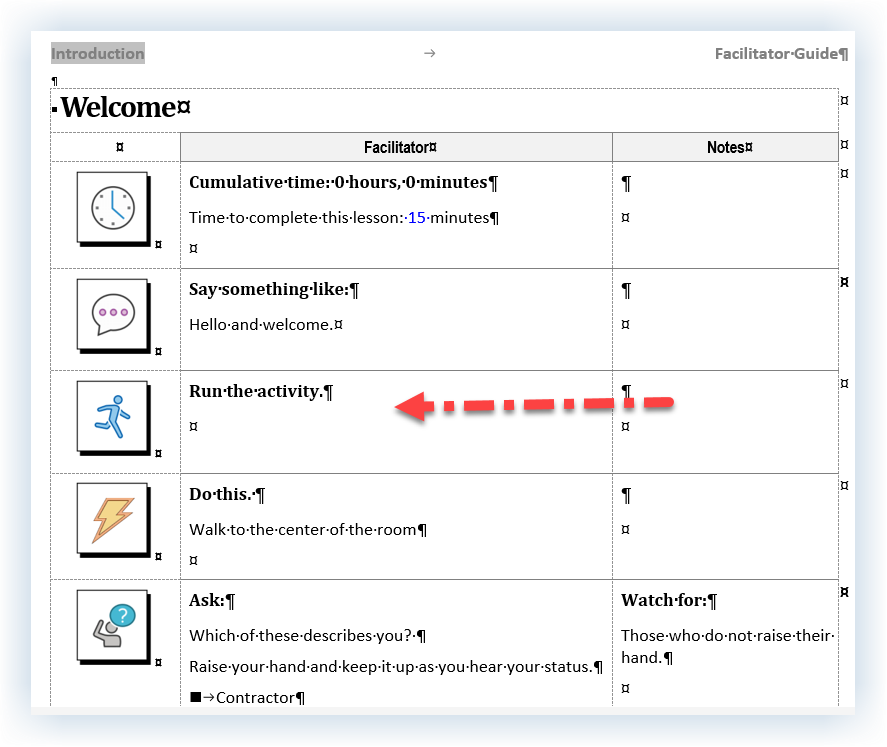
1. Go to your Welcome Lesson page and take a moment to look at it.
a. Notice that the Lesson is a table.
b. Also notice the red text.
2. Push the red text further down the page.
a. Place your cursor by the paragraph mark below the Lesson Time block.
b. Press Enter a few times to push the red text further down the page. The red text must be the final thing in your Facilitator Guide.
3. Add a Say Block:
a. Place your cursor in the Lesson Time block.
b. Click Instructor-led (ILT) on the LGPro ribbon.
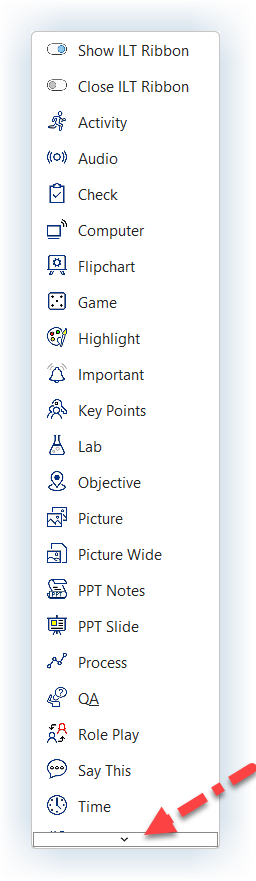
c. Click Say This in the drop-down list of icons.
d. Your cursor will be sitting next to the end of cell symbol (one of Word’s formatting marks).
e. Type in: Hello and welcome.
4. Add a Do block:
a. With your cursor in the Say block, click Virtual ILT in the Content Blocks group.
b. Click Do This
c. Your cursor will be sitting next to a paragraph mark (one of Word’s formatting marks).
d. Type in: Do this.
e. Press Enter and type in: Walk to the center of the room.
f. Notice the two different text styles.
5. Add a Q&A block:
a. With your cursor in the Do block, click Instructor-led (ILT) and then click on QA in the drop-down list.
b. Your cursor will be sitting next to the “end of cell” symbol.
c. Type in: Which of these describes you?
d. Press Enter & type in: Raise your hand and keep it up as you hear your status.
e. Press Enter & type in: Contractor
f. With your cursor in or next to “Contractor” click Bullet 1 in the Text and Table Formatting group on the LGPro ribbon.
g. Press Enter & type in: New employee
h. Press enter & type in: Supervisor
6. Look at your Q&A block. Place your cursor by the paragraph mark in the third column and
a. Type in: Watch for:
b. Hit enter & type in: Those who do not raise their hand.
7. Add an Activity block in between the Say block and the Do block:
a. Place your cursor in the Say block and click Instructor-led ILT in the Content Blocks group. Click Activity.
8. Add a Slide block:
a. Place your cursor in the last Content Block in the Lesson, which will be the Q&A Block
b. Click Instructor-led (ILT) on the LGPro ribbon
c. Click PPT Slide in the drop-down list.
d. A Slide block is added to your lesson page as a placeholder.
e. Do not add anything into the Slide block cells right now. We will import a slide into this placeholder in a later exercise.

Go to your Welcome Lesson page & take a moment to look at it. Notice that:
The page header shows the name of the Module (Introduction) the Lesson is in, as well as the type of guidebook you are in: Facilitator Guide.
The Lesson table begins with a heading row that shows the Lesson name.
The next row contains column headings for column two (Facilitator) and column three (Notes). Column headings are only found in a Facilitator Guide. They can be customized in the Start a New Guidebook dialog box, which you use as you start a new Facilitator Guide.
The next row is the first Content Block, in this case a Lesson Time block. This block is automatically insert as you add a new Lesson. You can change this by clicking Parts > LeaderGuide Pro Preferences.
The first cell in the Content Block table row holds a LeaderGuide Pro icon. The second & third cells are available for you to add content, including images.
Always in a new Facilitator Guide or Participant Guide you will see the red text on the New Lesson page. Always work above/before the red text. It should always be the final thing in your Facilitator Guide or Participant Guide.
Detailed Steps


Push the red text down the page.
Place your cursor at the paragraph mark below the Lesson Time block
Press Enter a few times to push the red text further down the page.
Always work above/before the red text.
The red text should always be the final thing in your Facilitator Guide or Participant Guide.


Insert a Say Block
Place your cursor in the Lesson Time block
Click Instructor-led (ILT) in the Content Blocks group on the LeaderGuide Pro ribbon.
You will see a drop-down list of icons and their intended meaning. Click the little arrow at the bottom of the list to reveal a few more icons.
Click Say This in the drop-down list of Instructor-led (ILT) Content Block icons.
A “Say block” is added to your Lesson page, immediately below the Lesson Time block, as part of the Lesson table.
Your cursor will be sitting next to the end of cell symbol (one of Word’s formatting marks.)
Type in: Hello and welcome.


Add a Do block:
With your cursor in the Say block, click Virtual ILT in the Content Blocks group.
Click Do This in the drop-down list.
Your cursor will be sitting next to a paragraph mark (a Word formatting mark.)
Type in: Do this.
Press Enter and type in: Walk to the center of the room.
Notice the two different text styles.
The first line of text in a Content Block is an eye-catching directive headline.
The rest of the text is in a body text style that is easy to read.


LeaderGuide Pro Content Blocks:
Start with an icon to visually cue the facilitator.
Include a Directive Headline to verbally cue the facilitator that is either automatically added by LeaderGuide Pro or added by you.
Include concise and complete instructions for the facilitator, to ensure consistent delivery no matter which facilitator is running the class that is added by you.

Add a Q&A Block:
With your cursor in the Do block, click Instructor-led (ILT) on the LGPro ribbon.
Click on QA in the drop-down list.
Your cursor will be sitting next to the end of cell symbol.
Type in: Which of these describes you?
Press Enter and type in: Raise your hand and keep it up as you hear your status.
Press Enter and type in: Contractor
With your cursor in or next to “Contractor” click Bullet 1 in the Text and Table Formatting group on the LGPro ribbon to make “Contractor” a bulleted item.
Press Enter and type in: New employee
Press Enter and type in: Supervisor
Press Enter and type in: Manager
Notice that your bulleted list has continued


Add a note to your facilitator:
Place your cursor by the paragraph mark in the third column.
Type in: Watch for:
Press Enter and type in: Those who do not raise their hand.


Add an Activity block after the Say block:
Place your cursor in the Say block.
Click Instructor-led ILT in the Content Blocks group and click Activity.

Add a Slide block:
Place your cursor in the last Content Block on the page, the Q&A block.
Click Instructor-led (ILT) in the Content Blocks group on the LGPro ribbon.
Click PPT Slide in the drop-down list.
A Slide block is added to your lesson page.
Do not add anything into the Slide block cells right now. And do not change the slide number.
We will import a slide into this placeholder in a later exercise.
