

Working with the Instructional Analysis Section
The Instructional Analysis section contains placeholders for the following information.
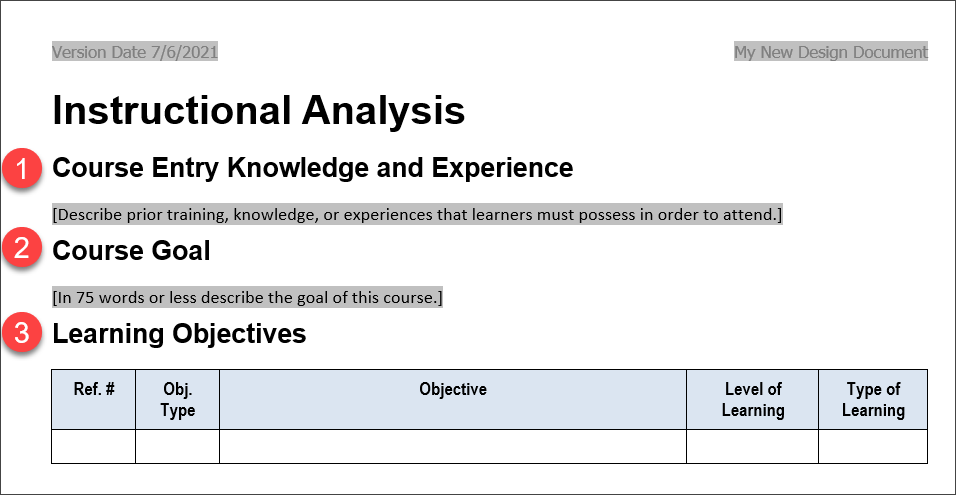
Course Entry Knowledge and Experience a.k.a. Prerequisites
Type into the text field to complete this portion
Course Goal
Type into the text field to complete this portion
Learning Objectives
Use the Learning Hierarchy function to automate this task
You’ll find the button for this on the Learning Design Tool ribbon
How to Add Course Entry Knowledge and Experience

Place your cursor in the gray shaded area under the Course Entry Knowledge and Experience heading.
Type in a description of the prior training, knowledge, or experiences that learners must possess in order to attend this new training program.
You can also copy content from another document and paste it in.
If you Copy and Paste

Place your cursor in the spot where you want to add the copied content
Click the Paste Unformatted button, which is in the Text Formatting group on the ribbon
This will add your copied content in a style consistent with your Design Document style guide, for the most professional appearance.
How to Add a Course Goal

Place your cursor in the gray shaded area under the Course Goal heading.
Type in a description of the goal of this course.
You can also copy content from another document and paste it in.
To paste, click the Paste Unformatted button, which is in the Text Formatting group on the ribbon.
How to Add Learning Objectives — The Heart and Soul of your Design
We suggest you read the information below first to better understand how the Learning Design Tool automation works. Or, jump right to our step-by-step instructions.
Keep in mind that learning objectives:
Always begin with an action verb.
Briefly state the outcomes you expect learners to achieve.
Are measurable - you can test to determine whether a student has achieved the learning outcome.
Click the Learning Hierarchy button to add Learning Objectives
Don’t type into the table on the page in your design document.
You will populate the table by using the the automated Learning Hierarchy form.

When you click the Learning Hierarchy button you launch the powerful learning objectives building function of the Learning Design Tool.
This will open the Learning Hierarchy form you will use to add your learning objectives.
Follow the step-by-step instructions provided below.
But first, here is an overview of the three key parts the Learning Hierarchy form.

Part One - Learning Objective Reference Numbers
Begin by adding a reference number for the first learning objective.
Each learning objective must have a unique reference number.
All reference numbering begins with “1.0”
The format of the reference number is ##0.0##
This means the maximum reference number is 3-numbers to the left of the decimal point and 3-numbers to the right.
Numbering for Terminal and Enabling Objectives
A Terminal objective’s reference number is to the left of the decimal point.
For example, the first listed terminal objective would be 1.0
The second terminal objective would be 2.0
An Enabling objective’s reference number is to the right of the decimal point.
For example, the enabling objectives for terminal objective 1.0 would be 1.1, 1.2, 1.3, …
The enabling objectives for terminal objective 2.0 would be 2.1, 2.2, 2.3, … and so on.
Part Two - Learning Objectives

The next item to select when adding a new learning objective is the Learning Domain.
Then, select the Learning Level and Type to enable the appropriate action verbs.
Action Verbs only populate after you make a Learning Level selection.
An Action Verb is required to write an Objective.
About Learning Levels
You have three Learning Level choices:
The Knowledge Domain, based on Bloom’s taxonomy.
You can choose which version of Bloom’s taxonomy to use, original or revised, in the Customizing function of this software.
The Skill Domain, based on the Dave (1975) taxonomy.
The Attitudinal Domain, based on Krathwhol (1964) taxonomy.
Making a Learning Level selection auto-populates the Learning Type.
However, you can adjust the Learning Type to any of the available selections.
About Action Verbs
You must select an Action Verb to begin writing your objective. Once selected, your verb appears in the Learning Objective text box.

This is where you complete the writing of the learning objective, including any criteria and conditions.
Each Objective must begin with an action verb. Add the criteria and conditions of the objective after the verb.
About Learning Types
Learning Types are a means of further describing a specific level of learning associated with the learner’s ability. For example:
In Dave’s Skill Domain, Level One is “Imitation.” We categorized the Learning Type as “Replicating,” meaning the learner is able to perform, but only with direct guidance from others.
In Bloom’s original Knowledge Domain, Level One is “Knowledge.” We set the Learning Type as “Facts,” meaning the learner’s ability to recall facts.
Learning Types are more than just a restatement of Learning Level descriptors.
They define the sophistication quality of the content a learner must master in order to perform at the expected level.
Learning Types and Learning Levels are not lock-stepped together.
An objective might have a Learning Level of 2, but the content that must be mastered might be categorized as Learning Type 3 or 4. In these situations it is imperative to carefully choose the Action Verb as well as the Learning Objective measurement criteria and conditions to fit the situation.
Part Three - Learning Objective Dependency References
The Dependency Reference text box is an area for you to add objective dependency references to the objective you are adding or updating.
These dependency references are used later in the design document creation process when you begin to construct an optimum instructional sequence for your course design.
At this stage of your learning design construction, you are only documenting each terminal objective and all subordinate enabling objectives.
The reference numbering of these objectives has nothing ultimately to do with the “teaching order” of them.
With that said, you should annotate objectives, both terminal and enabling, that have any dependencies on each other.
Validation
When you click the “OK” button to close out of the Learning Hierarchy form, the software will automatically notate each terminal objective’s dependency for their subordinate enabling objectives in the list, so you don’t have to do that.
However, you should annotate if a specific terminal objective is dependent on another one, or if there is a specific dependency that an enabling objective has on one or more other enabling or terminal objectives being acquired first.
This is particularly important for enabling objectives that have content “type” level that is higher than the terminal objective’s “type” level.
Given a situation where an enabling objective’s content “type” sophistication is greater than the terminal objective’s “type,” it begs the question, “Where did the learner gain the experience of working with that kind of content?” The answer might be from another listed objective in this document, or even some prerequisite accomplishment fulfilled outside of this course’s design. If the learner’s ability to work with this content comes from within this design’s scope, then a Dependency Reference should be marked on the enabling objective.
To annotate dependencies

Type a comma separated list of the dependent reference numbers into the Dependency Reference textbox.
For example:
If terminal objective 2.0 is dependent on terminal objective 4.0 being acquired first, then the dependency notation on terminal objective 2.0 would be 4.0
Or, enabling objective 2.5 was dependent on acquiring enabling objectives 3.4 and 3.5 first, then the dependency on enabling objective 2.5 would be marked as 3.4,3.5 in the Dependency Reference textbox.
To add, remove, update, items in the hierarchy
The “Add” button places a new objective into the hierarchy, it’s inserted at the end of list.
When you select an item from the list you can then alter them and click the “Update” button to apply your edits to the hierarchy.
The specific item you updated stays in the hierarchy at its current position.
If you need to move an item up or down, select it from the list and then click the “Move Up” or “Move Down” button.
Removing something works similar and if you want to clear the edit boxes of something selected, click the “Unselect” button.
Warning Messages
When you are in the process of adding objective to the hierarchy you may encounter warning messages about sequencing, action verb changes, levels not being compatible and others. Pay attention to them and make any corrections as required. The new or updated Learning Objectives Hierarchy list will not be placed into your Learning Design Document until all errors are resolved
Step by Step - How to Add Learning Objectives
Type in a Terminal Objective reference number.
The first terminal objective must be 1.0
The Objective Type will set based on your reference number.
Every Terminal Objective must have at least one Enabling Objective.
Select a Domain.
Select a Learning Level.
A Learning Type is set by default.
Optionally, you can adjust the Learning Type from the included list.
Select an Action Verb.
The Action Verb list populates automatically after you select a Learning Level.
The selected Action Verb will populate the Learning Objective text box.
Type in the rest of the objective.
If desired, Add Measurement Criteria.
Click Add when your Objective is complete.
The Reference Number field will automatically update to the next sequential reference number.

9. View your completed Objective in the top of the form.
Repeat Steps 1 - 9 to add more objectives
10. Click OK
This will run a Validation of your Learning Objectives and transfer them into your design document.
Validation runs to make sure your Learning Levels are in the proper order.
You cannot have an Enabling Objective with a higher Learning Level than the Terminal Objective it is associated with.
If errors are found the Tool will tell you and give you the opportunity to make the necessary adjustments.
