
How to Start a New Guidebook
Elements Pro will build a starting point document into which you can add your instructional content.
Guidebook Types
Participant Guide for the learners, or
Facilitator Guide for the instructors.
Both documents will include:
A Cover page, an Acknowledgements page, a Table of Contents page, an Overview module with lesson placeholders for Purpose & Learning Objectives, and a New Module placeholder with a New Lesson page.
Video walk-thru: How to Start a New Guidebook
What’s the difference?
The Cover page and page headers will either say “Facilitator Guide” or “Participant Guide.”
A Facilitator Guide will have Lesson page headings for Facilitator & Notes or Producer.
In both documents, a Module is a Topic and a Lesson is a Subtopic.
Getting Ready - Gather your Source Materials
PowerPoint: If you plan to start from existing slides & notes, find and open the correct PowerPoint file.
Course Outline: If you don’t have one, consider creating an outline of your main topics and subtopics. Your topics will become Modules & your subtopics will become Lessons
PDF: If you have content in PDF files, either convert them to Word or images.
Instructions
Step One - Bring up the Elements Pro Ribbon in Word

The NEW button the the Elements Pro ribbon in Word.
Open Word
Click the Elements Pro tab along the top of your screen
Click the NEW button on the Elements Pro ribbon
You will see the Start a New Guidebook dialog box, which you will use to set up your new document
Step Two - Use the Start a New Guidebook dialog box to:

The Elements Pro Start a New Guidebook dialog box
Add the name of your course
Choose your guidebook type
Choose your page layout
Choose which Collection to use
Choose your print setting
Set your copyright & revision date
Click OK to create your new document
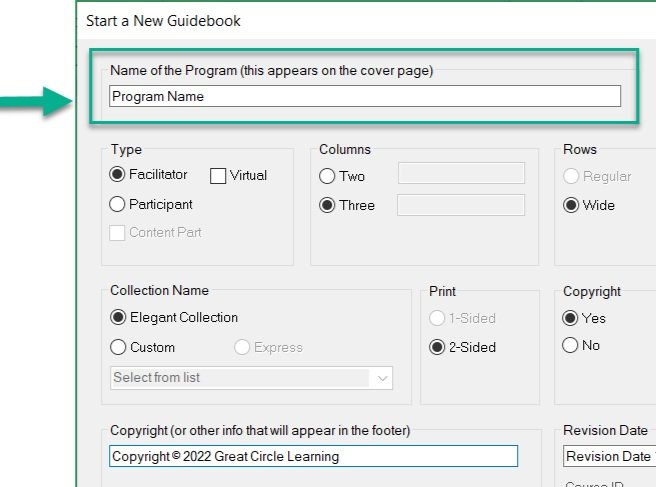
1. Add a Program Name
In the Start a New Guidebook dialog box:
Type in the name of your course
This will appear on your:
Cover page
Acknowledgements page
Even-numbered page footers
To change your course name later:
Edit it on the Cover page of your guidebook

2. Choose your Guidebook Type
In the Start a New Guidebook dialog box:
Set your guidebook type
This will determine what appears on your cover page and page headers:
Either “Facilitator Guide” or “Participant Guide”
If you choose Virtual:
Your slides will be imported as thumbnails into a 3-column page layout
3. Set up your Page Layout

In the Start a New Guidebook dialog box:
Select either a two-column or a three-column Lesson page layout
If you choose two-column:
You can also choose Regular or Wide, which impacts how much usable space you will have to work with
Select your overall document set up:
either Portrait or Landscape
4. Choose your Collection

In the Start a New Guidebook dialog box:
Choose which Collection to use
Elements Pro includes three Collections:
Default
Elegant
Modern
To see your options:
Click Custom and then Select from the list
The Collection you choose will impact your:
Cover page layout
Fonts & Numbered Lists
Icons

5. Choose your Print setup
In the Start a New Guidebook dialog box:
Choose your print setting
Select two-sided if:
you will be printing on both sides of the paper
or if you want your PDF to set up properly in a two-page view
6. Set up your Copyright & Revision Date

In the Start a New Guidebook dialog box:
Set your copyright & revision date info
Choose to:
Include or Hide
Preview & Edit:
Your copyright
Your revision date
This information will appear:
On the Acknowledgements page
In the odd-numbered page footers

7. Click OK to create your New Guidebook
In the Start a New Guidebook dialog box:
Click OK to create your new document
Once you click OK:
Take your hand off your mouse
Watch for several messages from Elements
SAVE your new document when prompted
Say “Yes” or “No” to the question about adding images to your document now
Say “yes” if you are ready to import a PowerPoint file
Get Help as you set up your New Guidebook
In the Start a New Guidebook dialog box:
Click the little blue TV icon for a help video
Click the Elements Pro logo for written help