
Get the Most out of Your Free Trial
Scroll down for more…
11. Build a Facilitator Guide with Slides & Notes and Add Content Blocks
Complete this 7-minute exercise to go from a blank page to a Facilitator Guide with Modules and Lessons built from imported slides, with slide notes moved into content blocks.


Quick Steps
Begin by setting up a new Facilitator Guide, importing slides as you start:
Download & open our Sample PowerPoint file named: Juno Classic Gear
Click New on the LGPro ribbon to create a new 3-column Facilitator Guide. Type in a Course Name: Juno Classics. Type in a Course ID: JCPL-23. Leave the other settings as is and click OK.
Save the file.
Say Yes to question about adding images. You will now work through four import slides dialog boxes to import our Sample PowerPoint file.
In the first dialog box:
Select the options to place the image in column Three and the PPT Notes in column Two.
In the next dialog box:
Select the Sample PowerPoint file to import.
Click OK.
In the lower right corner of the next dialog box:
Click SAVE and then click the Blue X.
In the next dialog box:
Click OK. This will start the slide import. Take your hand off your mouse & wait for the message telling you the action has been completed successfully.
Click OK to the Action Completed Successfully message.
Now start working in your new Facilitator Guide, adding Content Blocks and doing some text formatting.
Click Go To > Table of Contents.
Look at the Modules section and notice that Modules and Lessons were added as you imported the slides.
Hover your cursor by the page number for the Welcome & Overview Lesson and use Ctrl+Click to go to the first page of that lesson.
On your lesson page, notice that you are seeing PPT Slide blocks, with your slide images in column 3 and slide notes in column 2.
In the Lesson Time block:
Place your cursor in the blue hatch marks and type in 10.
Delete the text highlighted in yellow.
In the Slide 1 block:
Delete the word DO.
Place your cursor in what is now the first line of text and click the Title button in the Text and Table Formatting group to format that line of text as a headline.
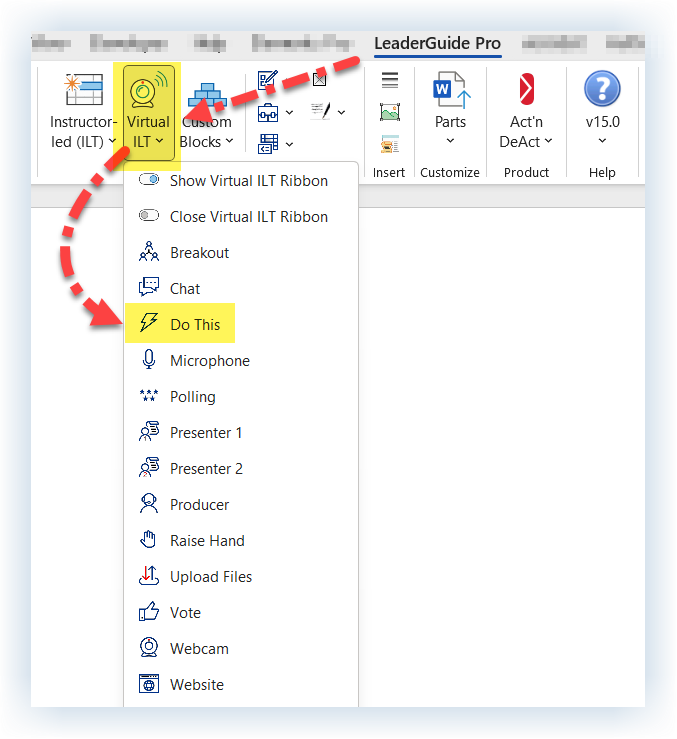
Highlight the next sentence & click Virtual ILT in the Content Blocks group on the LGPro ribbon.
Click Do This in the drop-down list of content blocks.
Notice that the text you highlighted is now in a Do This content block, sitting below the Slide 1 block. Delete it from the Slide 1 block.
Place your cursor next to the paragraph mark above the word “Personally” and type in Do: to add a headline.
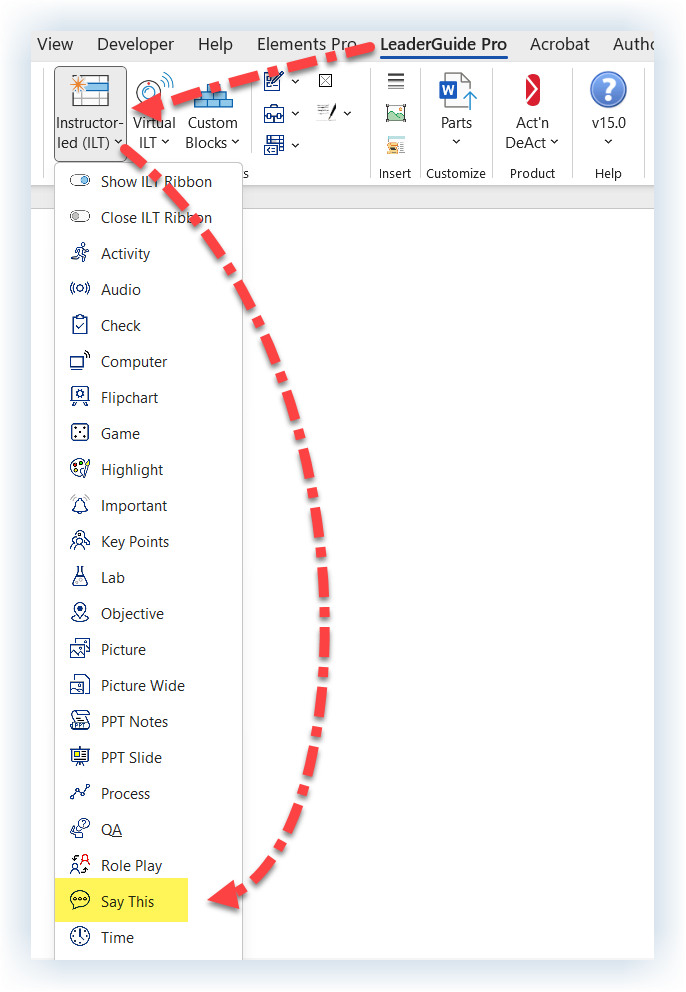
With your cursor in the Do block, click Instructor-led (ILT) in the Content Blocks group.
Click Say This in the drop-down list of content blocks. Notice that the Say Content Block comes in with a headline.
Below the headline type in: Hello and welcome. Please turn to page 7 in your participant workbook.
In the third column cell, type in: Look around.
Press Enter and then type in: Make sure everyone has a participant workbook.
In the Slide 2 block:
Make the first line a headline by placing your cursor in it and clicking Title in the Text and Table Formatting group.
Highlight the agenda items and bullet them, using the Bullet button in the Text and Table Formatting group.
Highlight the final sentence in the block, click Instructor-led (ILT) and click QA to move that text into a QA block. Delete it from the Slide 2 block.
Scroll to the next page of your lesson, noticing that LeaderGuide Pro is taking care of the pagination and the headers and footers for you.
In the Slide 3 block:
Highlight the final paragraph of text.
Click Instructor-led (ILT) and click Key Points to move that text into a Key Points block. Delete the text from the Slide 2 block.
Click Go To > Next Lesson.
Place your cursor in the Lesson Time block and click Instructor-led (ILT).
Click Say This from the drop-down list of Content Blocks.
Copy some text from another source.
Place your cursor in the Say block, at the end of cell mark below the headline.
In the Text and Table Formatting group, click Paste Special to paste in your copied text in the LeaderGuide Pro text style (striping out the source formatting.)
Continue to add a few more Content Blocks from both the Instructor-led (ILT) and the Virtual ILT Content Block options.
Use the detailed steps that follow for more guidance.

Begin by setting up a new Facilitator Guide, importing slides as you start:
Click the image to download & open our Sample PowerPoint file named: Juno Classic Gear
Detailed Steps


Go to Exercise 1: Set Up a New Facilitator Guide and follow the instructions up to step 5. Then return to this exercise.
At Step 5, say YES instead of NO to the question about adding images
You will now work through four dialog boxes to import our Sample PowerPoint file.
In the first dialog box:
Select the option to place Images in column Three
And place the PPT Notes in column Two.
In the next dialog box:
The Sample PowerPoint file, Juno Classic Gear, will be showing and highlighted.
Click OK.
In the lower right corner of the next dialog box:
Click SAVE and then click the Blue X to close out of the dialog box.
NOTE
This dialog box is showing Table of Contents markers that have been added to the Sample PowerPoint file.
The result will be a Facilitator Guide with Modules and Lessons built out based on the slides.
In the next (and last) dialog box:
Leave the settings as is & click OK. This will start the slide import.
Take your hand off your mouse
Wait for the message telling you the action has been completed successfully… and click OK


On your lesson page:
Notice that you are seeing PPT Slide blocks, with your slide images in column 3 and slide notes in column 2.
In the Lesson Time block, place your cursor in the blue hash marks and type in 10.
Delete the text highlighted in yellow.
In the Slide 1 block, delete the word DO.
Place your cursor in Display slide as participants enter the room which is now the first line of text and click the Title button in the Text and Table Formatting group to format that line of text as a headline.


Add a Do This block and move some text from the Slide 1 block into it.
In the Slide 1 block, highlight the sentence: Personally welcome each participant by saying their name and handing them a participant workbook.
Click Virtual ILT in the Content Blocks group on the LGPro ribbon.
Click Do This in the drop-down list of content blocks.
Notice that the text you highlighted in the Slide 1 block is now in a Do This content block, which is sitting below the Slide 1 block. (You can now delete the text from the Slide 1 block.)
In the Do This block, place your cursor next to the paragraph mark above the word “Personally” and type in Do: to add a headline.


Add a Say This Content Block
With your cursor in the Do block, click Instructor-led (ILT) in the Content Blocks group.
Click Say This in the drop-down list of content blocks.
Notice that the Say Content Block comes in with a headline.
Below the headline type in: Hello and welcome. Please turn to page 7 in your participant workbook.
In the third column cell, type in: Look around.
Press Enter and then type in: Make sure everyone has a participant workbook.


In the Slide 2 block:
Make the first line Use the slide to walk through the Agenda a headline by placing your cursor in it and clicking Title in the Text and Table Formatting group.
Highlight the agenda items and bullet them, using the Bullet button in the Text and Table Formatting group.
Highlight the final sentence in the block: Ask if anyone has anything to add.
Click Instructor-led (ILT) and click QA to move that text into a QA block. (Delete the text from the Slide 2 block)


Scroll to the next page of your lesson
Notice that LeaderGuide Pro is taking care of the pagination and the headers and footers for you.
In the Slide 3 block, highlight the final paragraph of text.
Click Instructor-led (ILT) and click Key Points to move that text into a Key Points block. (Delete the text from the Slide 2 block). Bullet the text.


Go to your next Lesson
Click Go To > Next Lesson.
Place your cursor in the Lesson Time block and click Instructor-led (ILT).
Click Say This from the drop-down list of Content Blocks.
Copy some text from another source.
Place your cursor in the Say block, at the end of cell mark below the headline.
In the Text and Table Formatting group, click Paste Special to paste in your copied text in the LeaderGuide Pro text style (striping out the source formatting.)


Add a few more Content Blocks
Continue to add a few more Content Blocks from both the Instructor-led (ILT) and the Virtual ILT Content Block options.
