To save time and ensure consistency, a Participant Guide can be extracted from a Facilitator Guide.
This learner-facing tool has two purposes:
To support learner engagement during the training and
To support application of the learning on the job.
Participant Guide Structure
Section 1: Cover & Acknowledgements
Cover page
Acknowledgements page
Section 2: Preparation
Table of Contents
Section 3: Delivery Instructions
Modules
Lessons
Section 4: Appendix (Optional)
Appendix Content
A Page by Page Look at a LeaderGuide Pro Participant Guide
Looking at a Light Blue Collection Participant Guide
Participant Guide Cover - Modern Collection
To Customize with your logo and graphics: Click Parts>LeaderGuide Pro Preferences on LGPro ribbon.
For different looking Cover pages, choose from the included Collections as you start a new Participant Guide.
When Extracting a Participant Guide from a Facilitator Guide, you can choose to use a different Collection for the Participant Guide.
Acknowledgements Page
To Customize with your copyright and revision date information click Parts>LeaderGuide Pro Preferences on LGPro ribbon.
Edit the other text on this page as needed.
Do not delete the Section break you will see when working in the document.
Table of Contents in a Participant Guide
This page builds automatically.
Do not type on this page.
To edit this page, change the Module and Lesson names on the Module and Lesson pages, and then click Update All Fields on the LGPro ribbon.
Note that you can only edit a Lesson name on the first page of the Lesson.
First Module Page
In a Participant Guide, this page introduces participants to the training they are to about to engage in.
Also in a Participant Guide, a new Module is signified simply by the Module name at the top of the page. The first Lesson, with instructional content, occupies the rest of the page.
Learning Objectives page in the Overview Module
This page lists what participants will be able to do upon completion of the training.
It can also hold space for participants to add notes about what they hope to accomplish.
First Instructional Module-Lesson page
This page is where your instructional content begins.
You will build this page by adding Content Blocks from the LGPro ribbon and then typing in your instructions.
About Working with What LeaderGuide Pro sets up for You
Embrace the templates and automation to save time and ensure consistent results.
Select an option below:
The Collections
Adding Content
Editing Content
When editing content
Share a COPY of your LeaderGuide Pro files with non-LeaderGuide Pro users
Because it would be easy for them to inadvertently do things that will interfere with the LeaderGuide Pro automation, like:
Paste one type of icon over another to change a Content Block
Delete the non-printing red text
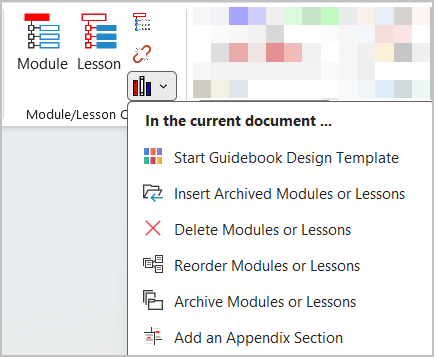
Consider using Librarian to Archive Modules & Lessons
Archiving creates stand-alone copies, which can make it easier to work in.
After the archived content is editted, use Librarian>Insert Archived Modules and Lessons to add them back into your full Facilitator Guide
And delete the old content using Librarian>Delete Modules and Lessons
When using LeaderGuide Pro you are also in Word
To you add content ...
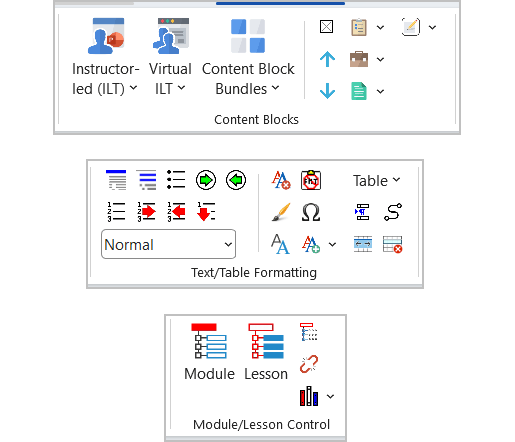
ALWAYS add Content Blocks from the LGPro ribbon
Type your content in.
Use the LeaderGuide Pro Text/Table Formatting group on the LGPro ribbon to:
Change font styles
LGPro Title
LGPro Text
LGPro Bullet
LGPro Number
Apply bulleted and numbered lists
Paste in content copied from another document
Add tables, and more.
Click Module or Lesson on the LGPro ribbon when you need to add a new Module or Lesson
Save your LeaderGuide Pro files using Word's Save function
We recommend that you Save to your LGPro Local (personal) and LGPro Master (shared) Library folders
Print or PDF your guidebooks the same way you print or PDF Word documents
Avoid Word's Undo and Redo functions because with LeaderGuide Pro their are often multiple actions associated with the automated functions
For working with PowerPoint and Images
and more
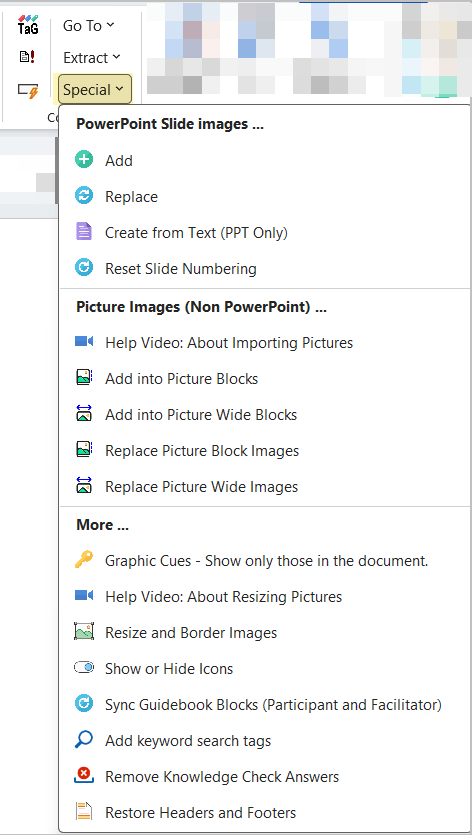
Click Special to access time-saving automation to:
Add PowerPoint
Replace existing PowerPoint images when your slides change
Create PowerPoint from text that you write within your Facilitator Guide
Reset slide numbering after you add or delete slides
Add images into Picture Content Blocks
Replace images
Resize and border images
Control what the Graphic Cues page displays
Show or Hide content block icons & content
Sync content between companion Facilitator and Participant Guides after updating content in one file
Remove Knowledge Check Answers - helpful when extracting from a Facilitator Guide to a Participant Guide
Restore Headers and Footers
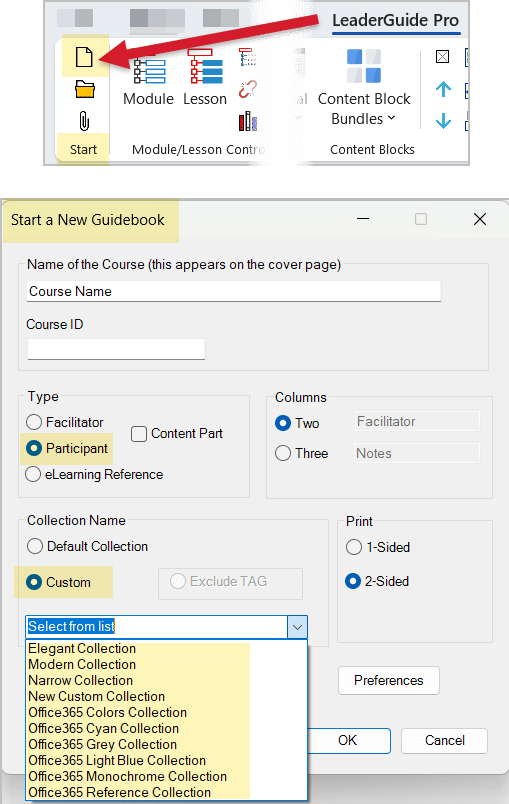
Choose a Collection when you Start a New Participant Guide
Even if you Extract from a Facilitator Guide, you will have the opportunity to select a Collection.
The Collection includes all the Parts required to build your Participant Guide.
All of the included Collections contain the same Parts.
What differentiates the Collections are the style and formatting and graphic treatments that end up giving each Collection a distinctive look. For example:
Different fonts
Different icons
Different color schemes.
The best way to understand the Collections is to:
Create a new Participant Guide using each included Collection.
Use the Collection Name as the Course Name
After saving your new participant guides it will be easy to compare & identify the Collections you prefer, based on the:
Cover page
Icons
Fonts & styles
And more.
Once your find the Collection you prefer:
Set it as your "Preferred Collection" so that LeaderGuide Pro will default to using it any time you start a new guidebook
You can still also choose any of the other Collections
To set your "Preferred Collection" click Parts > LeaderGuide Pro Preferences.
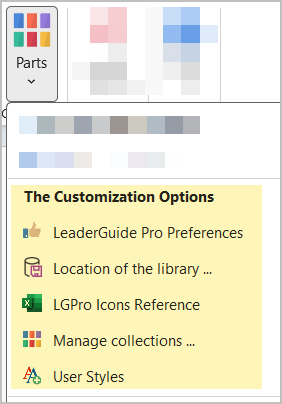
Use the LeaderGuide Pro Customize Options
Click Parts to reveal a dropdown menu of Customization wizards:
LeaderGuide Pro Preferences
Add your logo & copyright and a lot more
Open this wizard to see everything it does - it is very easy to use
Location of the Library
Use this to see the file path to the LeaderGuide Pro Local & Master Library folders
Each user has their own personal Local Library folder
Also use this to set a new shared location for the Master Library folder
One person can set the Master Library location and share that with other users
Everyone you share the Master Library location with can access it
LGPro Icons Reference
Use this to see the icon sets for each Collection
Manage Collections
Use this to create custom Collections
Contact us for assistance with this - we will help you get started
User Styles
Use this to add custom styles that will be available no matter which Collection you are using
Contact us for assistance with this if you are not skilled at creating styles in Word
It is important to use the LeaderGuide Pro customization tools because:
This ensures that the changes you make will not interfere with LeaderGuide Pro functionality.
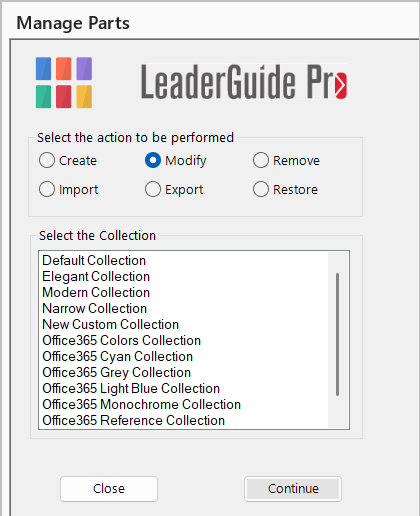
To create or modify a Custom Collection
Click Parts > Manage Collections:
This opens the Manage Parts wizard, which you you use to:
Create a new Collection
Modify an existing Collection
Remove a Collection
Import a Collection that has been shared with you
Export a Collection to share with your colleagues
Restore a Collection that has been modified
Use the included Parts Customization Wizards to create your own Collections.
Copy & modify any of the included Collections to add your own:
Cover page
Icons
Default text
Fonts & styles
And more.
Once created, Custom Collections can be:
Shared
Used as the basis for additional custom Collections.
CONTACT USfor assistance in getting started with creating & modifying custom Collections.
About all the stuff associated with the smart templates
When working in a Facilitator Guide or Participant Guide:
This is the Course Name you added when you started your Participant Guide
It appears on your Cover page in the Program Name space
Program Name has special coding to make it repeat at certain places in your guidebook
To change the Program Name (course Name), type over what's there on your Cover page without changing the font or the style
These are non-printing so you only see them when working in your documents with Word's formatting marks turned on
DO NOT DELETE the Section Breaks and red text - which you will not see if you turn off Word's formatting marks
These are controlled by LeaderGuide Pro
If you want to change these, use the LGPro customization tools
An Overview Module is automatically included as the starting point in every LeaderGuide Pro Participant Guide
If the Participant Guide was extracted from a Facilitator Guide, then the Purpose and Learning Objectives Lessons in this Module will be populated with content drawn from the Program in Perspective section in the Facilitator Guide
If the Participant Guide was created from the Start a New guidebook wizard, then the Purpose and Learning Objectives Lessons in this Module will be waiting for you to add the appropriate content
To repurpose this section, simply type over the Module and Lesson Names and the click Update All Fields on the LGPro ribbon
As many subsequent Modules and Lessons as needed can be added
If the Participant Guide was extracted from a Facilitator Guide, then the Table of Contents and the document itself will be populated with the Modules and Lessons and the Content Blocks you specified, drawn from the Facilitator Guide
If the Participant Guide was created from the Start a New Guidebook wizard, then the Learning Design Template outline you selected will populate the Table of Contents and Module/Lesson pages will be set up waiting for you to add content
In a Participant Guide a Module Page start with the Module Name
The Module Name is immediately followed by a Lesson Name
The Lesson Name is immediately followed by the instructional content
The Module Name appears in the page headers for this just this module and in the Table of Contents
To edit the Module Name simply type over whatever is currently on the page - Do NOT change the font or the style
Every Module has at least one Lesson
Lessons communicate the instructional content in an at-a-glance format
The Lesson Name at the top of the page appears in the Table of Contents, indented below the Module it is associated with
To edit the Lesson Name, type over the existing name on the first of the Lesson and then click Update All Fields
Lesson pages are built with Content Blocks that you add from the LeaderGuide Pro ribbon
Type your instructional content into the Content Blocks
Lesson pages will automatically flow over to subsequent pages as needed
The last Lesson in a Module always ends with a Transition Block tht is added by LeaderGuide Pro after you click the TAG button
The last Lesson in a your Facilitator Guide always ends with non-printing red text - do NOT delete
ALWAYS add Content Blocks from the LeaderGuide Pro ribbon
Content Blocks are table rows
Manage the Content Block rows from the Text-Table Formatting group
Use the Content Blocks to chunk your content
These are designed to maintain professional formatting
And they provide an at-a-glance, easy-to-use layout
Any time you see red text it is non-printing
It is there for a reason - Do NOT delete it
Word's formatting marks turn on when using LeaderGuide Pro
They help you maintain the professional formatting
Keep them on when working in your Participant Guide