LGPro Styles play a critical role in supporting the LeaderGuide Pro automation.
The LGP Styles work hand in hand with the LeaderGuide Pro code to:
Support key LeaderGuide Pro functions
Ensure consistent formatting
Enhance readability
Make document navigation possible
Allow for global style changes with a mouse click
Make the documents easy to edit, update, and repurpose.
Why the LGPro Styles Matter
Functionality
LeaderGuide Pro needs the LGP Styles to do its work.
Here are a few examples:
Set up your Facilitator Guides & Participant Guides
Maintain consistency as your guidebooks are built out
Import slides and notes and images
Extract content from one guidebook to another
Archive, Insert, Reorder and Delete Modules and Lessons
Navigate from the Table of Contents, Training at a Glance, the Go To function
Save a lot of time and headaches for you as the developer
Readability
Readability is a key feature of an effective Facilitator Guide.
LGPro Styles enhance readability by:
Creating a clear visual hierarchy
Making content easier to scan, process, and understand
Applying consistent fonts, spacing, and pagination
Readability is about:
Your brain being able to process written information efficiently
Key points standing out as important
Time saved by not have to search for basic information and wonder what the writer's intent is.
Formatting
Consistent formatting a hallmark of a professional publication
It is NOT easy to do, which is why LeaderGuide Pro does it for you.
Consistent formatting helps your instructors and participants:
Engage with the material
Easily follow & navigate the material
Regard the material as credible
A Look at a Few LGPro Styles
Every Collection Contains a Style Guide with the same Style Names.
Course Name on Cover Page - Repeated in a field on Acknowledgements page
The Course Name has an LGPro Style Name of "LGP Program Name"
If you place your cursor in "Course Name" on the Cover page, you will see the Style Name in the Styles box in the Text/Table Formatting group on the LGPro ribbon.
All the Collections include this style name. It may look different depending on which Collection you are using, because the style's attributes (font, font size, color, etc.) can be different.
But the Style Name must remain the same, so that the fields in the document that are tied to "Style Name" can pick up the correct text. The field at the top of the Acknowledgements page illustrates this.
Copyright and Revision Date on the Acknowledgements page & Repeated in the footer of odd-numbered pages
The Copyright and Revision Date always sit on the Acknowledgements page. Their style names are: "LGP Copyright" and "LGP Revision Date"
These style names are tied to fields in the odd-numbered page footers. If you overwrite or manually delete these two styles from the Acknowledgements page you will see an error message in the footers. To correct that problem, re-apply the styles.
Not comfortable with styles? Contact us.
Module Name and Lesson Name
The Module Name sits at the top of every module page. It's style name is "LGP Module Name" and it repeats in a field in page headers. It is also picked up by the Table of Contents and the Training at a Glance.
The Lesson Name sits at the top of every lesson page. It's style name is "LGP Lesson Name" and it carries over to the top of each subsequent page in the lesson. It is also picked up by the Table of Contents.
Content Block on a Lesson page
Every Content Block has a unique LGPro style name based on the icon in the block. This one is "zLGPIconCheck" and THIS is what LeaderGuide Pro searches for when you run an Extract or use the Go To function to go to the next occurrence of any particular block.
If you copy & paste a different icon over the one you see here, the LGPro style name will still be "zLGPIconCheck" and you will end up with inconsistent results if you run an Extract or use the Go To function.
To change the icon, insert a new Content Block with the icon you need from the LGPro ribbon.
Every Collection has the same set of Content Block Icon style names, but the icon images are different, to provide for different looks.
LGP Title and LGP Text in a Content Block on a Lesson page
LGP Title and LGP Text are the two most used styles in your guidebooks.
Every Collection's Style Guide includes "LGP Title" and "LGP Text" styles. The fonts may be different, but the style names must remain the same.
These styles apply automatically as you add Contents Blocks to a Lesson page. You can also control them by using the buttons in the Text/Table Formatting group on the LGPro ribbon.
A few of Word's formatting marks
These are non-printing characters that indicate:
the end of a table row
the end of a table cell
a new paragraph
spaces between words
All of these marks help you literally see what's going on on the page you are working in. And they help you build and maintain professional formatting.
About Working with the LeaderGuide Pro Styles
Let the styles do the work for you.
Select an option below:
How to Identify a Style
How to Apply a Style
How to Customize a Style
Customizing Styles is an Advanced Skill
We recommend contacting us for assistance.
Do NOT:
Change the LGPro Style Names
Manually edit the styles
Use the included LeaderGuide Pro Styles Customization tools.
To customize the standard styles that apply automatically as you use LeaderGuide Pro:
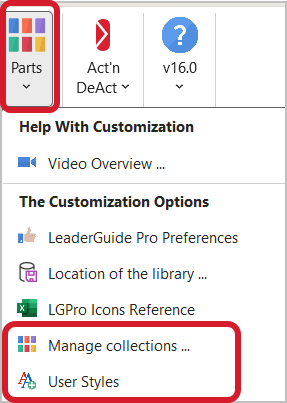
Click Parts > Manage Collections
Follow the steps to Modify a Collection
Choose the Style Guide you want to modify
Follow the proper protocol for editing styles in Word
To ADD custom styles in addition to the standard styles that LeaderGuide Pro applies automatically:
Click Parts > User Styles
Use the provided wizard to add your unique styles
To change or add a style
You've got three options ...
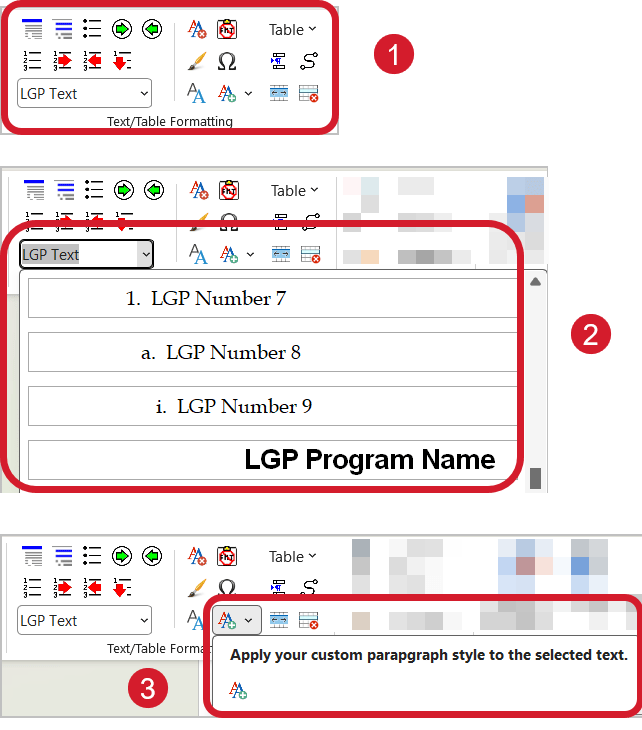
Use the buttons in the Text/Table Formatting group
Click the Styles box and add the style you need from there
Use any custom styles you have added
NOTE:
Working with styles is a challenge for most of us.
That's why LeaderGuide Pro tries to handle this for you.
So, for those times when you need more, CONTACT US for assistance.
How to Identify a Style in your Facilitator Guide
Recognizing the styles will help you work more efficiently.
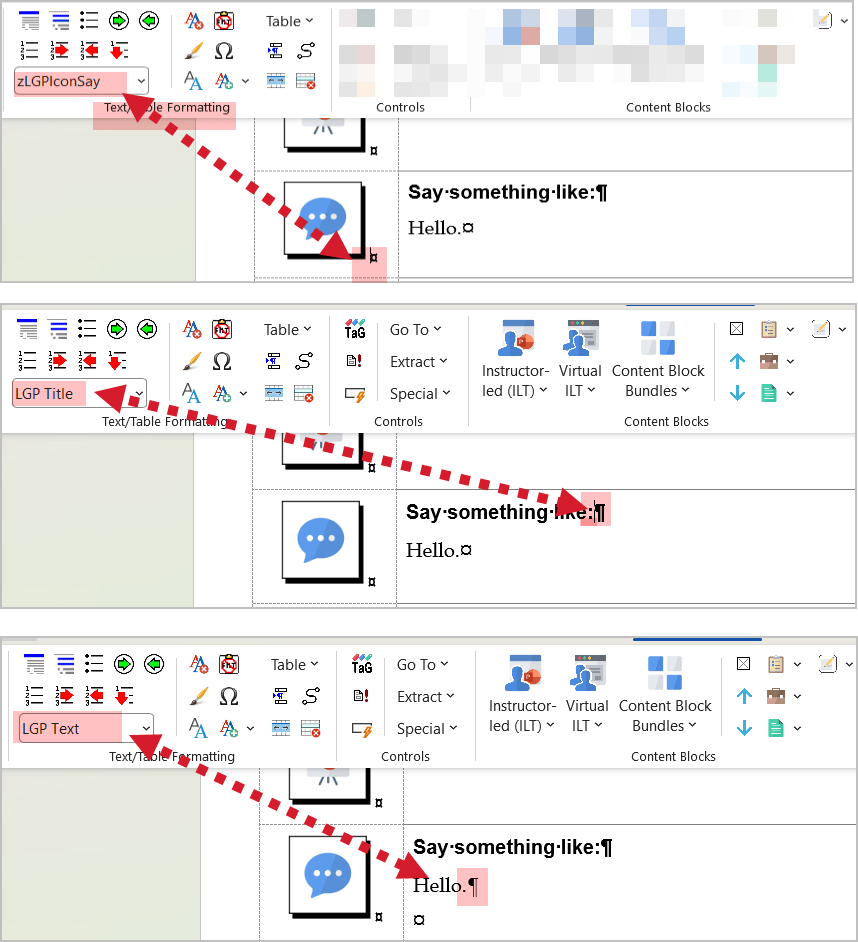
Place your cursor next to the style you want to identify.
Look in the Styles box in the Text/Table formatting group on the LGPro ribbon.
For example:
Placing your cursor next to a Content Block Icon reveals it's style name.
Placing your cursor next to a line of text reveals the font's style name.
Getting Comfortable with the LGPro Styles
Recognizing and understanding how to work with the LGPro Styles you will be working with the most
This is the Course Name you added when you started your Facilitator Guide
It appears on your Cover page in the Program Name space
Program Name has special coding to make it repeat at certain places in your guidebook
To change the Program Name (course Name), type over what's there on your Cover page without changing the font or the style
These are non-printing
You only see them when working in your document with Word's formatting marks turned on
DO NOT DELETE the Section Breaks and red text
These are controlled by LeaderGuide Pro
They pick up information from other key spots in your documents
If you want to change these, use the LGPro customization tools
Click Parts > Manage Collections
Every LeaderGuide Pro Facilitator Guide begins with this section.
It contains information to help your instructors understand:
how the facilitator guide is set up and
what they need to know and do to prepare for the live delivery
Do NOT manually delete this section
To remove this section:
Create a CUSTOM Collection
Click Parts > Manage Collections
To edit the content in this section you can either:
Manually edit the text, like any other Word document
Or create a Custom Collection so that you only have to make your edits once
Go to the corresponding Module page and make the edits there.
Then click Update All Fields on the LGPro ribbon
To REMOVE the this page:
Click Exclude TAG when starting your new Facilitator Guide
Or Extract a new Facilitator Guide from the existing one and click Exclude TAG when starting your new Facilitator Guide
Do NOT
Type on this page
Delete the Section Break and non-printing red text at the end of this page
Manually delete this page
Only appear in Facilitator Guides
Provide a concise synopsis of what the instructor will be doing and for how long - for just this discrete chunk of the training
Feed the Training at a Glance Page
The Module Name at the top of the page appears in the page headers for this just this module and in the Table of Contents and in the Training at a Glance
To edit the Module Name simply type over whatever is currently on the page - Do NOT change the font or the style
The Module Time is managed for you by LeaderGuide Pro based on the Lesson time
Work with this page as is - do not add more Content Blocks
Every Module has at least one Lesson
Lessons communicate the instructional content in an at-a-glance format
The Lesson Name at the top of the page appears in the Table of Contents, indented below the Module it is associated with
To edit the Lesson Name, type over the existing name on the first of the Lesson and then click Update All Fields
Lesson pages are built with Content Blocks that you add from the LeaderGuide Pro ribbon
Type your instructional content into the Content Blocks
Lesson pages will automatically flow over to subsequent pages as needed
The last Lesson in a Module always ends with a Transition Block tht is added by LeaderGuide Pro after you click the TAG button
The last Lesson in a your Facilitator Guide always ends with non-printing red text - do NOT delete
ALWAYS add Content Blocks from the LeaderGuide Pro ribbon
Content Blocks are table rows
Manage the Content Block rows from the Text-Table Formatting group
Use the Content Blocks to chunk your content
These are designed to maintain professional formatting.
And they provide an at-a-glance, easy-to-use layout.
Any time you see red text it is non-printing
It is there for a reason - Do NOT delete it
Word's formatting marks turn on when using LeaderGuide Pro
They help you maintain the professional formatting
Keep them on when working in your Facilitator Guide